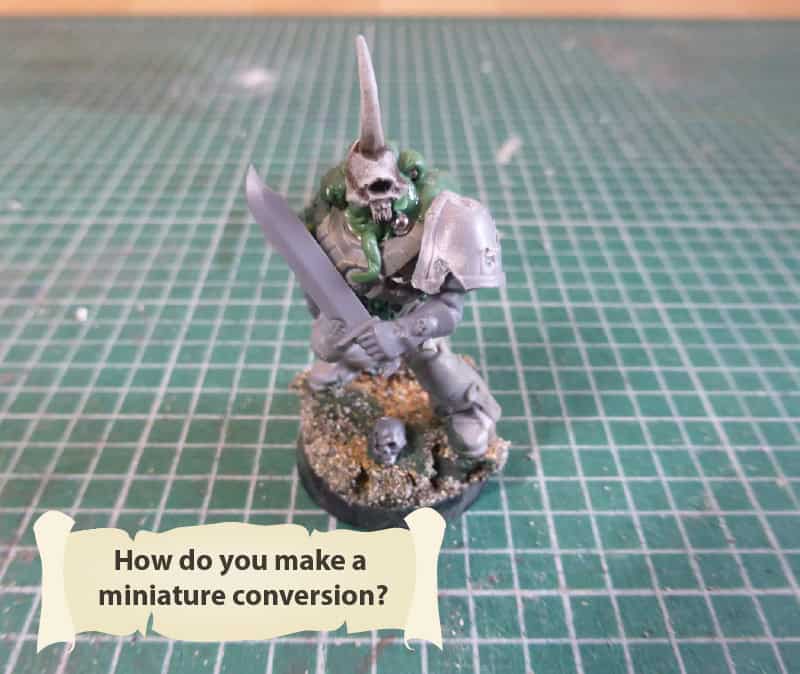
How do you make a miniature conversion! A step by step breakdown to a fun a creative part of the model making.
This is a broad and imaginative topic for Warhammer collectors and miniature modellers alike!
The basics of creating a miniature conversion can certainly be broken down into core steps and stages. From knowing where to start, to getting hold of the bits and pieces to create your conversion.
If you are new to converting miniatures this post may be helpful in telling you what a conversion is.
It should be noted here, that a miniature conversion differs from a kit-bash but the lines between the two can often blur when modifying miniatures.
The lazy answer discerning between two for the sake of this post:-
When you convert something, you modify it. You change it! That counts for miniatures too. To convert is to change.
A kitbash is the mixing of model kits.
Feel free to read a bit more about what a kitbash vs what a miniature conversion is.
Detail Steps For Converting A Miniature
- Getting Started with your conversion ( get ideas )
- My Process Summary Part 2
- Select Pieces & Assemble your conversion
- Tips for applying glue
- Working with Green Stuff
- Applying final layers of Green Stuff
I would like to share how I converted some miniatures.
Conversions Story
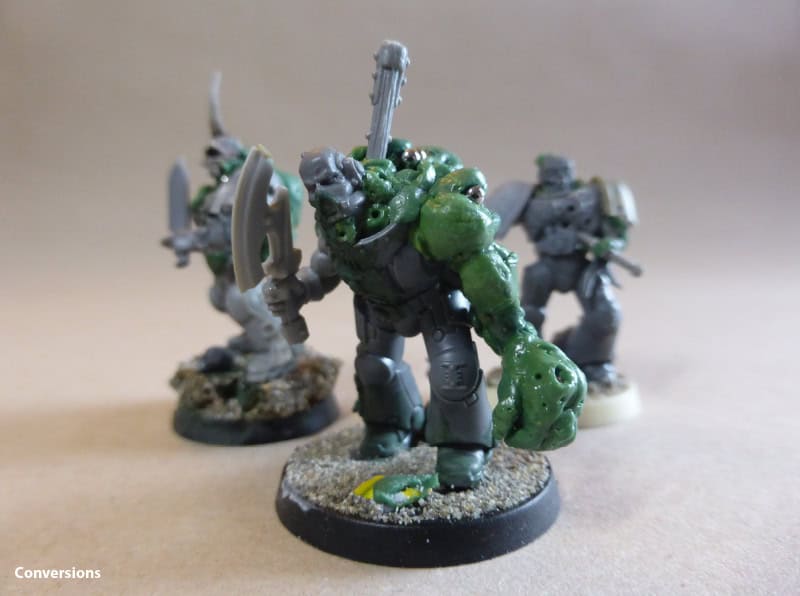
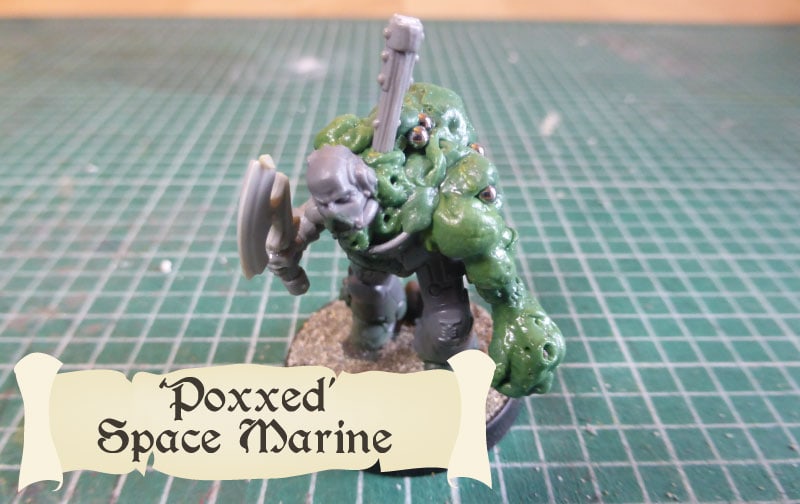
Space Marines have fallen to Pox Walkers. A topic that is fun for narrative play if nothing else and allows scope for creativity.
But first, I want to answer – in short, how you modify or convert miniatures.

How do you make a miniature conversion?
To convert a miniature, you take an existing model and change it by sculpting new parts, removing parts or by grafting new parts onto it. You create a unique miniature.
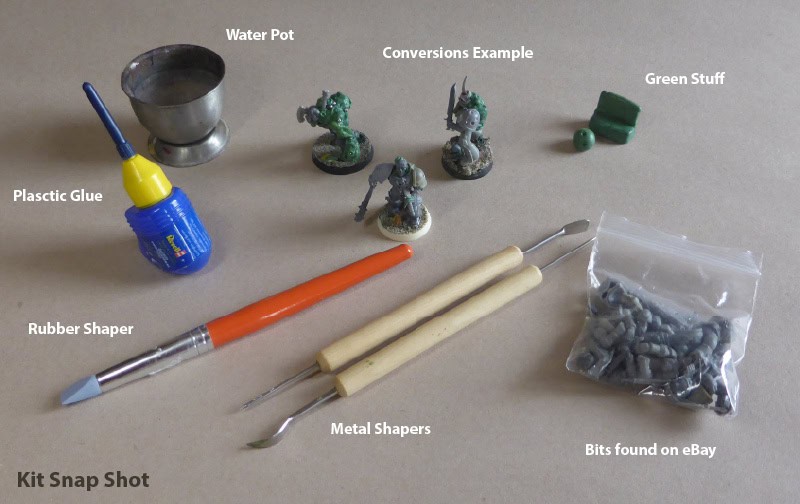
In order to convert or modify plastic miniatures you will need, clippers, glue, spare bits and if you are feeling brave – GreenStuff.
So that your miniature has some design logic and flow, you may want to plan your miniature. Consider sketching your miniature idea on a piece of paper for future reference.
Select some of the pieces that match the drawing, and put these to one side. I used a small sealable bag to keep them safe as I am prone to losing bits!
Where do you begin with creating miniature conversions?
If you know that you want to make a miniature conversion but don’t quite know what! Look at your existing army to see what you already have.
For ideas you can look on Pinterest, Cool Mini Or Not, Google images, a website called Convert or die, social media!
There are many places to look for ideas. Old White Dwarf magazines also have a wealth of weird and wacky ideas from the rogue trader era too.
Once you have an idea, you will now need the tools, a miniature(s) and some spare bits.
– where you can buy spare Warhammer bits.
Assuming you now have an idea, the bits and the tools. You can start clipping and sculpting away.
Quick Guide On Making A Miniature Conversion
These are quick steps on how to make a miniature conversion:-
- Get a rough idea for your conversion
- Buy or use the miniature you wish to convert
- Check to see if you have the pieces you need to make it
- Look for the pieces that you may need if you don’t have them
- Collect together everything into a pile or bag – Keep these together!
- Make sure you have all the tools you need to make a miniature conversion
- Start assembling your conversions by glueing, cutting and making the main model
- Wait to dry if needed and cut, add, stick the details down
- If you decide to use GreenStuff or Kneadite. mix the epoxy together
- Shape and mould your GreenStuff onto the model and allow to set overnight
- If you want to add more GreenStuff and then do so by mixing more together! And then allowing that to dry also.
- Once you are pleased with your miniature conversion, prime it with a base primer so it is ready to be painted painted. Let it dry.
- Your miniature conversion is ready to paint!
In the quick steps, that is how to make a conversion!
Modifying miniatures – how I started the Pox Marines
It should be noted that there are no official ‘Poxxed Marines’ to my knowledge, I have just used it as a name to reference the models. These miniatures are purely a figment of my imagination that would fit into a game environment.
Most of the inspiration came from looking at the bits box. And then asking the question…
What would a Space Marine look like if a Pox Walker got him? ( yeah right! )
A novel idea that I thought would be fun for a private collection.
There are no official rules for these either. I created them for artistic purposes and narrative play.
These are the steps I used to create these miniature conversions.
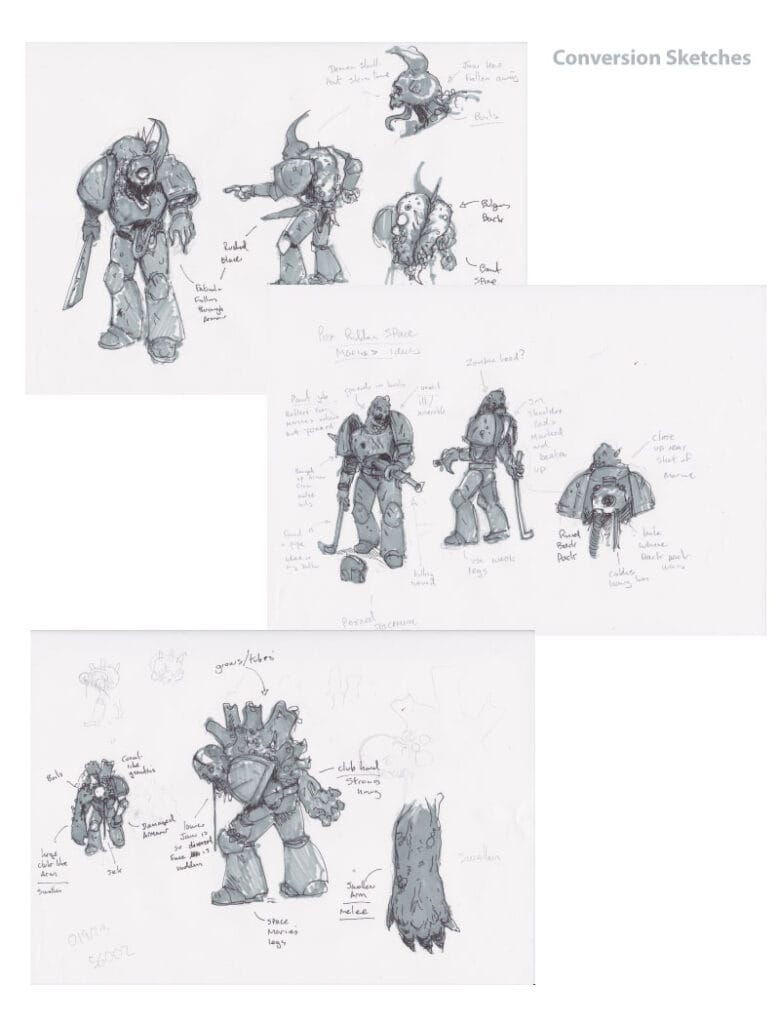
1) The Early Ideas
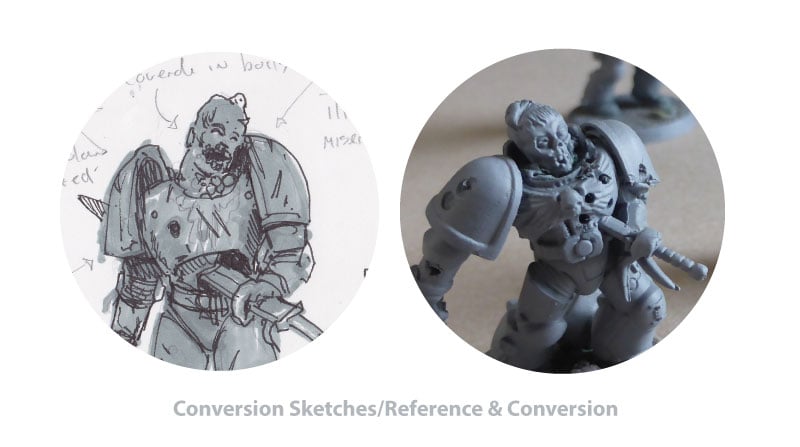
Below are some sketches that I started with for the ‘Poxxed’ Marines. Knowing my limited sculpting skills, I didn’t want to make the designs too ambitious.
* It should be noted that I am a character designer for board game makers and miniature creators! You can find out more here – Freelance character illustration for miniatures.
All 3 miniatures that I intended to create had their own unique look and feel. A mutated Poxman with a big arm. A more undead/diseased Space Marine that had been killed with a melee weapon.
And…
A more demonic Pox Walker – old plague bearer skull!
2) Collected the bits pieces together
Having an idea of what I was going to create, I now needed to consider the technicalities – how was I going to make these conversions!
To start with I raided a bits box. Many of these bits have come from eBay. eBay – has a wealth of bits and miniature junk!
Knowing that I had the bits and pieces that I needed. I then checked my tool kit. ( If you don’t have all the bits you need there and then, you can always buy the bits )
3 ) Checking I had the right tools
As a go-to for tools for arts and crafts. I use:-
- Clippers
- Green Stuff
- Poly Glue
- Sharp knife
- Cutting matt
- Metal Sculpting tools
- Small model files
- Small plastic bag to keep it all safe
*For these conversions that I created, I purchased a model drill and additional sculpting tools.
Knowing I had the right tools and bits. I was then ready to make the conversions.
4 ) Started assembling the conversions
I started with one character first to wet my feet. In this instance, it was the shambling one. From my selection of bits, I retrieved some: legs, a torso, pads and an arm with a club! And a zombie head.
These made up for the core of the model with the addition of shoulder pads etc. Of all the conversions from this set, this one involved the least amount of sculpting of Green Stuff.
In terms of being a conversion, this miniature straddles the line between being a kit-bash with extra bits being sculpted on.
Once I had selected the components from my bits pile, I started to build the other miniatures.
Starting with the bases, I glued some legs down and waited for them to dry. The legs would also show some animation in the model and make it look more animated with dynamic poses and stances – all part of the narrative!
Whilst the glue is out
While you have your glue out on the table, it makes sense to add more to the legs on the other 2. From my assortment of bits, I pulled out some, torso bits, a breastplate, pads.
Once the glue had set on the legs and bases. I glued the breastplates and torso’s down onto the waists.
I then waited for these to set!
*Make sure to wait until the glue has dried before you start the sculpts.
Easy tips for glueing conversions
Short snappy tips for glueing conversions together:-
- Make sure all the parts can fit together
- Check no burs or flashing can stop you from glueing pieces together
- Be patient and wait for the glue to bond!
- Use newspaper or a cutting matt ( or anything ) to protect your table from glue and cut marks
- A paper clip can be helpful in unblocking nozzles on glue ( or putting the lid on!)
- Don’t go overboard with glue
- Some glues such as poly cement can create strings and strands of glue. Be mindful not to drag these strands across the details of the miniature.
Using a model drill on the conversions
I checked that the models had set and dried! Using a model drill – I bored holes into the body armour for the appearance of battle damage and wounds. I also created little pockmarks on the shoulder pads before sticking them onto the conversions.
Drilling miniatures – it should be noted…
I found it better to drill smaller model pieces prior to assembly.
Trying to drill into an already assembled model poses a higher risk of breakage when using brute force. Drilling certain parts prior to assembly may save you from having to rebuild the model!
5 )Sculpting Green Stuff Onto The Miniatures
I waited for all the components to dry before working the Green Stuff.
This was one of my first attempts at sculpting GreenStuff! And remember that this topic looks at the basics of how to create a conversion. There are many talented miniature sculptors out there. Rupert Greyling is a good example of what you can do with sculpting miniatures.
After the initial preparation, I opened up my Green Stuff and mixed the two-part epoxy until it was soft and easy to mould.
The shambling one was the first. I rolled narrow lines of GreenStuff and then coiled these around his armour and limbs and then used metal sculpting tools to poke and manipulate the GreenStuff into position.
The shambler conversion to one side and made a start on the skull Pox Walker.
Skull Poxwalker / Marine
For this miniature had already glued the cork onto the base and, assembled the torso but I still needed to attach the top half of the head and the arms. This came after I had sculpted the GreenStuff onto the body.
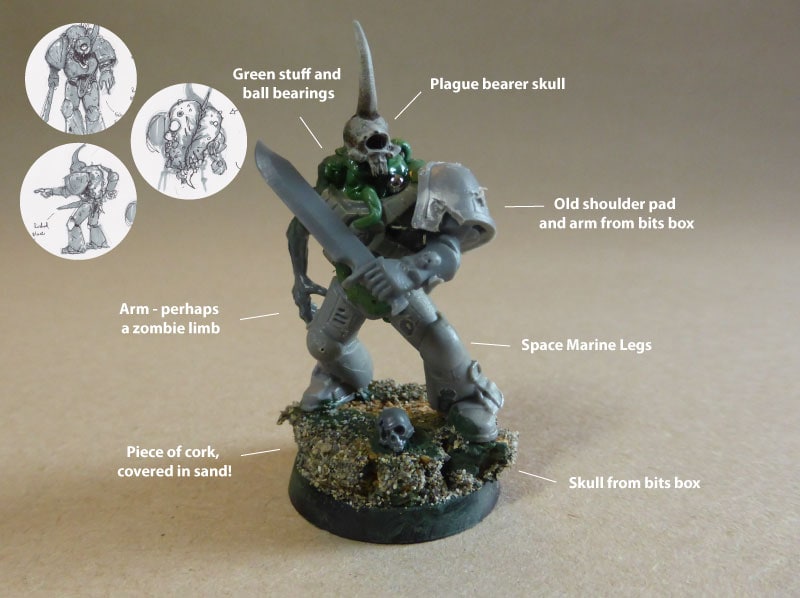
With my GreenStuff mixed together. I thumbed the parts and segments onto its torso to form the base for the mass and musculature. This was worked up in stages until I was happy with the mass.
I then built up a stub for a neck so I could position the head onto it. A peg coming from the body in essence!
‘Big Arm Conversion’ – Pox Walker
This started with the least amount of kit. For the sculpt of this miniature, again I started with the base and bulking up the mass. I used some leftover already dried Greenstuff ( don’t throw any away!) and squeezed these together and made a start on the arm.
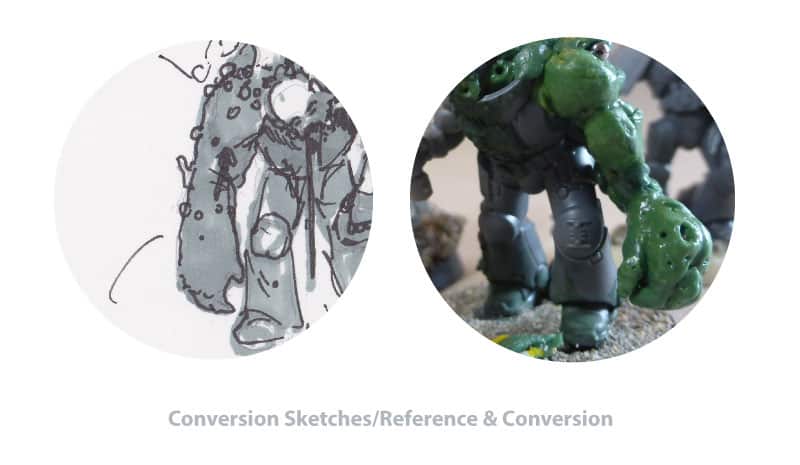
I knew the big and powerful misshapen arm was going to be a focal point. After a rummage through my arts and crafts box, I found some green wire! With clippers, I cut a small piece of the wire and inserted this into the body of the miniature.
This was so I could work up the sculpture of the arm.
I then created the slivers of muscle and started to build these onto the arm. I wrapped these both under and over to form the bicep and forearm muscles. These were going to be the under layers for the arm conversion on the miniature.
I the let these to set and harden!
While it dries.
Here is a bit about green stuff… ( whistles )
How do you make a miniature conversion with ‘Green Stuff’? ( Tips )
In order to make a miniature conversion with ‘Green Stuff’, you will need to mix the 2 part epoxy together ready for sculpting.
Green Stuff is a material that is commonly used in miniature and model making for various purposes. Before it cures, it can be used to sculpt entire miniatures as well as parts. GreenStuff can be manipulated with modelling tools before it sets. It is a great material to have in your arsenal of model making tools.
Here is an example of somebody making a complete miniature – FROM GREENSTUFF.
Using Green Stuff For your conversions
Once you have mixed the 2 part material together, you can start making your conversions using shaper tools and a bit of imagination.
Greenstuff can be used on both plastic and metal miniatures when it comes to conversions. You can graft new limbs onto a model, create different heads or completely change the appearance of the miniature with green stuff.
While Green Stuff is warm, it is pliable between your fingers. You can use shaping tools to cut, push, prod and mould Green Stuff to your desired shape.
Once the Green Stuff hardens you can then cut and shape GreenStuff or add more! Wireframes can also help to create a solid structure to build upon for your miniature.
6 ) Final layer of GreenStuff ( Back to the Pox Walkers )
Once the miniature conversion hardened, I started to work up the details such as the skin, muscles, spots, wounds etc.
I didn’t work on the GreenStuff sculpting all in one go! I built it up in stages. Allowing time for the Green Stuff to set before applying the additional layers.
After applying the last few details to the shambling one – I put this to one side to set and continued to work on the other 2. This one was complete.
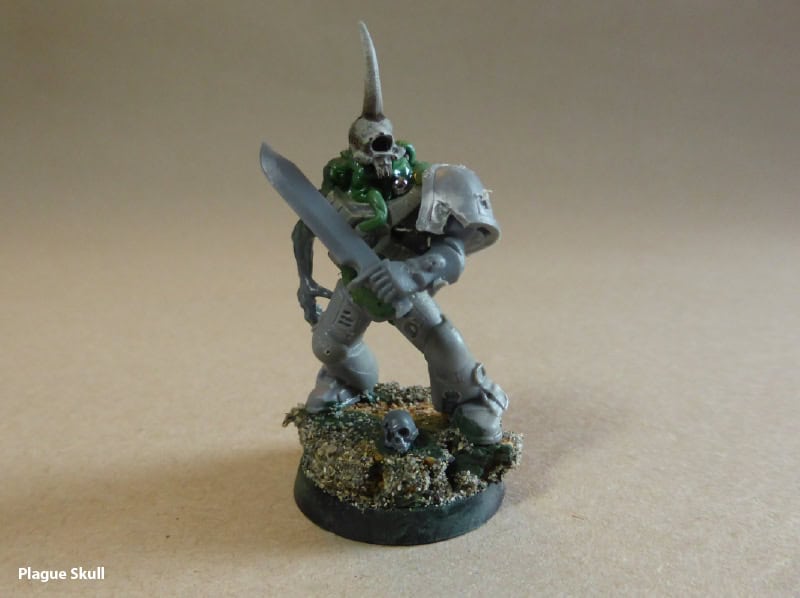
The Skull Pox Walker was next on the agenda.
Using a thin layer GreenStuff, I added a layer of torn skin across its bulging back. From the off, I wanted it to look as if the muscles and flesh burst out of his body. I rolled a thin layer of the Green Stuff and pulled it across the mass of his back and then cut it away to reveal the contents beneath.
This was also a great opportunity to create the pock-marked flesh with one of the metal shaper tools by gently stabbing into the soft layer of skin.
Once the green stuff had set. I glued the final parts on such as the shoulder pads, the skull etc. I then put this one to one side.
Club arm pox marine
After cutting my teeth on the other two designs and seeing how GreenStuff could be built up. I started the sculpt on the one with an almighty large arm!
I knew where I wanted to go with this conversion.
After the lumps and mass had set on its back, these acted as the base for the details and allowed for things such as the arm to be attached.
For the structure of the arm, I inserted a pilot hole with a piece of green wire. This gave some structure to build around when I had sculpted the limb.
*I knew this part would be heavy! It needed the support, also hence using a wire.
I bulked out the mass around the shoulders and sculpted it to resemble a human arm. A hideously oversized one, but a human arm nonetheless!
I pock-marked the skin and worked the ball-bearings in the muscles to create lumps and boils for texture and details.
After this had set, I then turned my attention to funnels on the back and the final details.
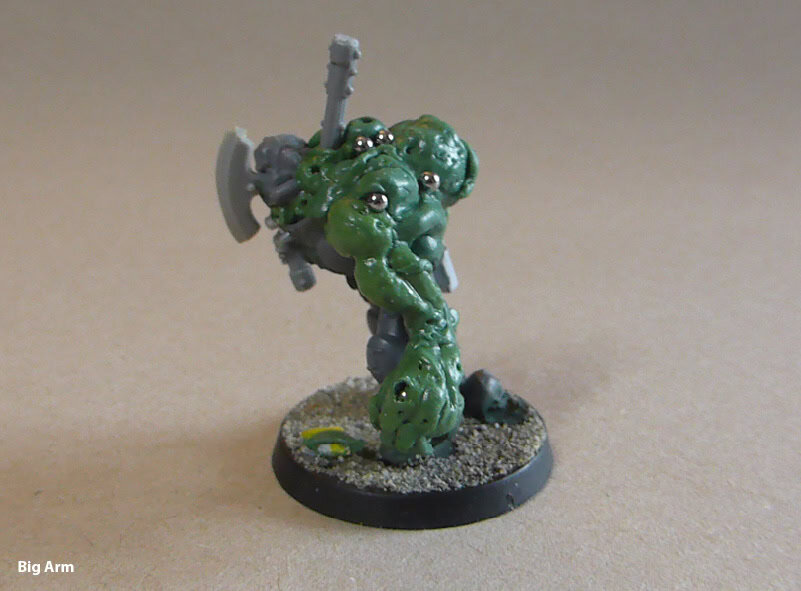
It was a fun conversion to create.
7 ) Spraying the conversions with primer
Once the conversions had set and hardened I took the miniatures outside and sprayed them with grey primer. I waited 30 minutes + so for the vapours to clear.
I then checked the conversions over.
Satisfied with my first full conversions. I then put these to one side and decided they will need a lick of paint.
One day…
That is the basics of how to make a miniature conversion with Kits and Green Stuff! Some imagination and some basic tools to get you started.

Miniature conversions need not be exclusive to Warhammer
On the topic of ‘how do you make a miniature conversion’ or how do you modify miniatures, it need not only apply to Warhammer models.
People that collect, convert or modify miniatures can be part of the historical wargaming community or any other science fiction or fantasy genre that has miniatures.
Although I am more than happy to say that these conversions are made from mostly Warhammer parts.
Converting miniatures is not exclusive to GW and their ranges. You can do it to others too.
It just so happens that Warhammer is hugely popular and lends itself well to conversions and kitbashing. It is all part of a popular hobby.
How do you make a miniature conversion | Why Convert Miniatures?
There are many reasons as to why you’d want to convert a miniature. You can read what constitutes as a conversion in this post. But the reason as to why convert a miniature in the first place can be many. Some collectors may wish to modify their miniatures because they want to explore their creativity and craft.
Others may also want to place their unique stamp on their collection.
You may wish to also save your sanity by not having to paint the exact same miniature for the 20th time! There are many reasons as to why you would want to, and each person has their own reasons and most of them being for good reasons too!
Collecting and painting miniatures is a hobby that explores a craft. It allows you to explore creativity without having to be a proficient portrait painter or illustrator. This post here covers a bit about how painting miniatures can be an art form or at least a skilled craft.
Besides, if there are many Space Marines on a tabletop. You might want to find ways of making yours stand out from the crowd!
You might also find some of these posts helpful in converting miniatures.
How do you make a miniature conversion and other topics
- Definiation of a model conversion
- Stripping paint from plastic miniatures
- Sculpting Greenstuff example – Burrows & Badgers
- Rupert Greyling Miniature Sculpture
- Is recasting miniatures illegal in the UK?
- Where you can get your miniatures plastic cast UK
- Difference between kit-bashing and conversions
- Where to get Warhammer bits and parts
- Box contents for Nurglings
- The different types of Nurglings
- Miniature differences between Genestealers
Product Listing –
External Sources Around making Conversions
Dragon Bone Games – a post about how to make a miniature conversion!